https://wotawallysbits.net
Utilities, Tips and Tutorials
Click on images to download the files
UKTS File List
I have made a list of all UKTS files for Rail Simulator, Railworks and TS Classic with ID numbers and details. This list should help you work out which files you want to download from the Archive site:
https://archive.org/details/@eldomtom2?tab=uploads
Updated to v1a on 24th April 2024 to include an .ods version and an extra HTML list which is A-Z, as well as a Read Me with how to search the HTML files
https://archive.org/details/@eldomtom2?tab=uploads
Updated to v1a on 24th April 2024 to include an .ods version and an extra HTML list which is A-Z, as well as a Read Me with how to search the HTML files
How to install an .rwp file
There is a very good Tutorial on the Digital Traction site http://www.digitaltraction.co.uk/ Written for TS2013, but is still relevant to TS2018 onwards - it can be downloaded from here:
http://digitaltraction.co.uk/mainsite/downloads/
TSClassic - copying to new "safe" version prior to major updates
Now that DTG have commenced their large updates to update TSClassic to a sim suitable for today's operating system - and already the first one has caused problems for many users - it is time to keep everything safe and still have a playable version of TSClassic.
Follow these instructions BEFORE a major DTG/Steam update.
I assume that your main copy is the one in your Steam folder that Steam updates and installs to. If this is the case and if you have plenty of room on the same Drive then just copy the complete railworks folder to anywhere on that Drive, but outside the Steam folder. This should be virtually instantaneous.
If you have to copy to another drive then do it in stages. Decide where you are going to copy it to and create a "New Folder" - name it "railworks".
Then copy into it all files and folders from your existing "railworks" folder apart from "Assets" and "Content".
Next, copy the "Contents" folder over.
Now for the assets folder - mine is 336GB, many users have larger assets folders
In your new "railworks" folder create a "New Folder" and name it "Assets".
Go to your original "Assets" folder. Select the first 8 or so developer folders and copy them to your new "Assets" folder. Repeat with the next batch and so on. All of this can be done over several sessions/days. Depending on the transfer speed the number of developer folders can be increased/decreased, especially if you have an idea of the size of a folder. Any large folders (DTG, Kuju, RSC plus others that you know are a similar size) should probably be copied over individually.
If you want to use this copy to play TSClassic then open the new "railworks" folder, right-click on "RailWorks64.exe" and select "Send To - Desktop (create shortcut)".
Use that desktop shortcut to start TSClassic.
When the big updates happens it will affect everything that was purchased and installed via Steam. In my case that includes folders of AP, AP_Waggonz, BMG, DRB_Simstuff, DT, JustTrains, Thomson and 28 others, as well as the more obvious DTG, Kuju, and RSC. All of those folders are the ones that need to be backed up and identifying which folders they are when mixed up with all your other folders would be very difficult.
(It is easy for me because my Steam copy of "railworks" is a vanilla version and is never used at all - apart from copying out to my main "railworks" folder).
As I understand it DTG will give plenty of notice as to when problems are likely to appear and the first updates are just tidying things up - these updates should benefit everyone and cause no long lasting problems.
Wotawally
Clearing Blueprints to help prevent "Out of Memory" problems
Instructions:
Open your Railworks\Assets folder
Right-Click and select "New - Text Document"
Copy the following two lines and paste into the empty document
del /s *.pak
pause
Save the file as: ClearBlueprints.bat
Right-click on it: Select "Send to Desktop (Make Shortcut)"
Double-Click on your new Desktop Shortcut to operate - preferably each time before you start TS Classic
Missing Items Milk Bottle Replacement by Wotawally
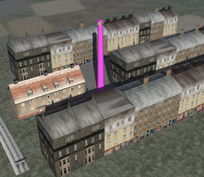
This is a little aid for anyone building, editing or testing a route. Missing items are identified with a tall pink chimney rather than a small milk bottle, making it easy to locate the missing item(s)
I got the idea for this after using Mully's Cooling Tower which, whilst easy to spot does make it difficult to sort out the problem if their are several items missing in a small area due to its large footprint.
If you want to revert to the original Milk Bottle then navigate to Assets\Kuju\RailSimulatorCore\System\Original files and copy the files from there into Assets\Kuju\RailSimulatorCore\System\ overwriting when asked. Clear your Blueprints.
Testing Scenarios - the quick way: Tutorial by Wotawally
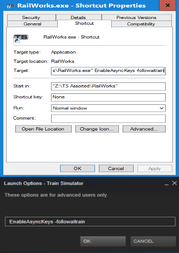
Testing scenarios, especially long ones, can take several hours. This tutorial shows you an easy way to do most of the testing using two Command Line Options when starting TS: “EnableAsyncKeys” and “-followaitrain”.
These options allow you to test the scenario at up to 5x normal speed whilst the computer controls the "Player Train" for you.
Full instructions to cover starting TS20** through the Steam Library page, a Desktop Shortcut, or in the Windows 10 start menu.
All of this information has been around for years but I haven’t seen any clear, detailed instructions anywhere. Hence this tutorial.
Whilst many know these command options already, there are many more who are either aware of them but don’t know how to use them, or are totally unaware that this sort of thing can be done
Track Protection Tutorial by Wotawally
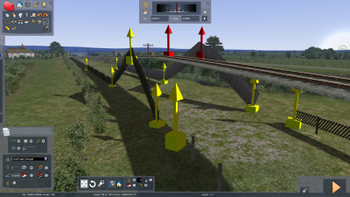
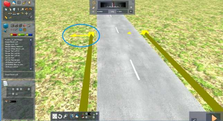
When you are route-building or just editing a route, it is so easy to damage the track by mistake. this can have serious consequences, especially if it is not noticed immediately.
This Tutorial shows you two easy ways to prevent that ever happening again. One method is just for scenery, the other allows you to edit roads and lofts and use all the tools normally available for creating scenery whilst keeping the track safe.
Thanks to RolandBP for his help with this little project
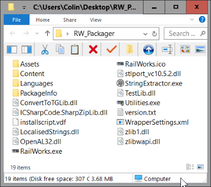
Creating rwp files outside the game folder by Wotawally
A tutorial for packaging rwp files without the long waits involved whilst using the default packager.
This method uses a dummy "railworks" folder.
The download is a .pdf file with instructions on what to do
A tutorial for packaging rwp files without the long waits involved whilst using the default packager.
This method uses a dummy "railworks" folder.
The download is a .pdf file with instructions on what to do
OverSpeeding Script for TS20** by Wotawally
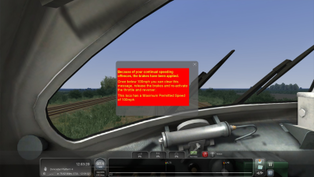
This is a script for use in scenarios for helping to prevent locos exceeding their permitted Maximum Speeds. Unlike others that I have seen this doesn't engage Emergency Brakes or end the Scenario.
A demo scenario for the Class55 Deltic on the GWML is included.
Also in the download are instructions to include the script into your own scenarios and information on altering the permitted speed and number of warnings.
There is a lot I don't fully understand so any help tidying it up and improving it will be appreciated.
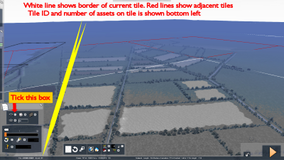
How to identify a tile in a route by Wotawally
A very simple tutorial for anyone that is not sure how to identify a tile.
A very simple tutorial for anyone that is not sure how to identify a tile.
Locating your Railworks folder by Wotawally
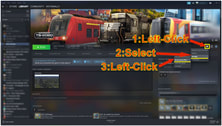
Open your Steam client and go to the Library page. Select TS20**
On the same line as "Play" go to the right past "Achievements" and you will see a cog symbol. (Before the info and star symbols)
Left-click on the cog symbol. Scroll down to "Manage"
Select and left-click on "Browse Local Files" This will open your Railworks folder.
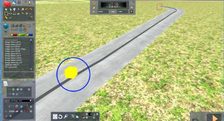
Laying Lofts using the Offset Tools by Nick Hudson
Laying a loft is straightforward, but it can be done much easier and more accurately by using the offset tools. The offset can be made using ANY previously laid loft, road or track. The loft to be made will automatically follow the gradient(s) in the previous construct, and also keep a fixed distance from the centre line.
Laying a loft is straightforward, but it can be done much easier and more accurately by using the offset tools. The offset can be made using ANY previously laid loft, road or track. The loft to be made will automatically follow the gradient(s) in the previous construct, and also keep a fixed distance from the centre line.
Lofts: Smoothing a change in gradient by Nick Hudson
When constructing a loft, such as track, road or wall, you may need to change the gradient between sections. Easy to do, but it does leave a sharp change which looks unsightly. To smooth that gradient change, you can follow these instructions.
When constructing a loft, such as track, road or wall, you may need to change the gradient between sections. Easy to do, but it does leave a sharp change which looks unsightly. To smooth that gradient change, you can follow these instructions.